Friday, December 30, 2011

Two Splendid Cards

{As seen today on the Authentique Paper blog}


As soon as I saw this layout from Brenda Smith on the Authentique Paper blog, I knew I wanted to do something similar.
I love the random bits around the edge of her page...and the stitching! Ah! So cute!

I took the basic idea from Brenda's layout and applied it to these two cards:


I used a few scraps I had left over from the Splendid collection 6x6 bundle and punched them out with various squeeze punches.

I put a little bit of adhesive around the edge of the card front to keep them in place while I used my sewing machine to add some stitching.
{Tip: Keep the adhesive away from the area where you will be stitching. Gummy sewing needles are not fun.}


Each card uses a die cut from the Splendid collection Excerpts - perfect for a quick sentiment!


Thanks for stopping by today!


Old Friend Supplies:
Cardstock: Bazzill (French Vanilla);
Patterned Paper: Authentique Paper (Splendid collection - 6x6);
Die Cuts: Authentique Paper (Splendid collection - Excerpts);
Stitching: Machine;
Tools: Fiskars (Trimmer, Scissors, Round N Round Squeeze Punches); Martha Stewart/EK Success (Scoring Board);


Family Masterpiece Supplies:
Cardstock: Bazzill (Snow);
Patterned Paper: Authentique Paper (Splendid collection - 6x6);
Die Cuts: Authentique Paper (Splendid collection - Excerpts);
Stitching: Machine;
Tools: Fiskars (Trimmer, Scissors, Leaf Squeeze Punches); Martha Stewart/EK Success (Scoring Board);

Monday, December 26, 2011

Home Decor - for free! {Kinda.}


It's been awhile since I've done any sewing...but I found these pictures of a pillow I made awhile back, so I thought I'd share.

I had some knit fabric from a previous project and used the stuffing from some well-worn throw pillows to create this pillow - basically for free.


{Okay, sure...I had to buy the fabric and the pillows originally, but I didn't buy anything new just for the purpose of this project.}

I love knit because you can leave the cut edge and not worry about it unraveling when you wash it. Bonus: it makes for a very comfy pillow cover!


Thanks for dropping by today!

Friday, December 23, 2011

Market Street Stamps meets CAS-ual Fridays for a Block Party

Have you heard?

Market Street Stamps and CAS-ual Fridays
are meeting up for a special challenge and Block Party!


The theme is: Brown Paper Packages Tied Up With String


I used the new "Faith In You" stamp set from Market Street Stamps for this clean and simple card. Just a bit of mist, some embossing, and of course some of The Twinery's twine!


For this special collaboration, both challenges will be running for two weeks!
You have until Wednesday January 4th to enter.

Between the 2 challenges, there are amazing prizes and even a Guest Designer spot up for grabs!
You can find the full details on the Market Street Stamps blog
and the CAS-ual Fridays blog.


Thanks for stopping by today!

Supplies:
Cardstock: The Paper Company (Kraft); Georgia Pacific (White);
Stamps: Market Street Stamps (Faith In You);
Ink: VersaMark (Watermark);
Embossing Powder: Hero Arts (White);
Mist: Studio Calico (Bluegrass);
Twine: The Twinery (Caribbean, Cappuccino);
Dies: Spellbinders (Labels Twenty);
Tools: Fiskars (Trimmer, Scissors, 1/8" Round Hand Punch); Martha Stewart/EK Success (Scoring Board);

Monday, December 19, 2011

Believing Butterfly {Market Street Stamps}

{As seen today on the Market Street Stamps blog}


It's almost time for another great new release from Market Street Stamps - and today I get to give you a little peek at a wonderful new set!


I took the fabulous new Believing Butterfly and created this card.


Be sure to head on over to the Market Street Stamps blog to check out what the other designers created with the new stamps!


Thanks for stopping by today!

Supplies:
Cardstock: The Paper Company (Kraft);
Stamps: Market Street Stamps (Believing Butterfly);
Ink: Tsukineko (Spring Pansy, Purple Hydrangea, Eggplant);
Mist: Studio Calico (Bluegrass);
Twine: The Twinery (Lilac);
Dies: Spellbinders (Labels Twenty);
Tools: Fiskars (Trimmer, Scissors; Martha Stewart/EK Success (Scoring Board);

Let the twine take center stage!

{As seen today on The Twinery's blog}


It is still so hard for me to believe that it is already December (and almost 2012)!

I have been so blessed to be able to be on The Twinery's Design Team this year and I must admit that I am sad to see all these final posts and goodbyes from some of my amazing teammates over on The Twinery's blog.

Like many of The Twinery's fans, I am crossing my fingers for a spot on next year's Design Team, but if I don't make the cut this will be my final official post for The Twinery.
No matter what happens, I will continue to use The Twinery's beautiful products and will continue to support The Twinery in whatever way I can.


I believe that The Twinery's twine is a beautiful product and there are so many great options to let the twine take center stage on your projects.

One way to showcase your twine is to create a pattern or shape with it. For this card I created these "heart strings" from Maraschino, Pink Sorbet, and Blossom twine:


The Twinery's twine also looks beautiful when crocheted.


For this tag I crochet a wreath from Peapod twine and topped it off with a little bow of Maraschino twine:


Sometimes it is just best to let the twine shine in a place where there would normally be something like string:


The tree garland was created with Maraschino twine and the bow features both Maraschino and Honeydew twine.


{If you joined us for The Twinery & Market Street Stamps blog hop you may have already seen this one...but I thought it was worth sharing again.}

Thanks for joining me here today and I wish each and every one of you:


this holiday season and throughout the new year!


Me + You Card Supplies:
Twine: The Twinery (Maraschino, Pink Sorbet, Blossom);
Cardstock: Bazzill (Tutu Pink);
Stamps: Market Street Stamps (Simple Joys);
Ink: Tsukineko (Pixie Dust);
Adhesive: Ranger (Matte Accents);
Tools: Fiskars (Trimmer, Scissors); Martha Stewart/EK Success (Scoring Board);


Take Time To Believe Tag Supplies:
Twine: The Twinery (Maraschino, Peapod);
Chipboard: Kraft Outlet;
Stamps: Market Street Stamps (Simple Joys);
Ink: Tsukineko (VersaMark); Memento (Rich Cocoa - marker and ink pad); Ranger (Distress Stain - Antique Linen);
Twill: May Arts;
Tools: Fiskars (Trimmer, Scissors); Crochet hook;


Joy Tree Supplies:
Twine: The Twinery (Maraschino, Honeydew);
Stamps: Market Street Stamps (Argyle, Simple Joys, Blast Off);
Ink: Tsukineko (Tea Leaves, Red Magic);
Cardstock: Georgia Pacific (White);
Other: Shrinky Dink (Shrink plastic);
Template: Tifany DeGough;
Tools: Fiskars (Trimmer, Scissors, Round N Round Squeeze Punch - Large, 1/8" Round Hand Punch); Tim Holtz (Tiny Attacher); Ranger (Heat Gun);


{Peace. Love. Joy.} Tag Supplies:
Twine: The Twinery (Lilac, Lemondrop, Mandarin, Pink Sorbet);
Cardstock: Georgia Pacific (White);
Stamps: Market Street Stamps (Joyful Snowman, So Happy);
Ink: Tsukineko (Purple Hydrangea);
Dies: Spellbinders (Floral Doily Motifs);
Other: (Christmas light beads);

Saturday, December 17, 2011

Blog Hop {Authentique Paper & Scor-Pal}


The Introduction:
If you are hopping along with us today: You should have come here from Authentique Paper's blog. If you did, you are in the right place! Welcome!
If you aren't already a follower, I'd love to have you follow my blog!

If you are one of my regular readers: Thanks for coming back! I love having you! Please join along in the hop - you can start at the Authentique Paper blog.

Here's the full hop order for today:
Authentique Paper
Tifany DeGough <--- You are here!
Steph Ackerman
Emily Lanham
Gini Cagle
Misty Buck
Lisa Andrews
Brenda Smith
Katie Tate
Cristine Redmond
Kittie Franken
Scor-Pal

The Prizes:
Authentique Paper is giving away a fabulous prize pack ($20 retail value)

Scor-Pal is giving away a Scor-Buddy ($20 retail value)

The Details:
Leave a comment on each blog along the hop. The winners will be chosen randomly from all comments on the manufacturer blogs AND the designer blogs.
{Winners must have a US/Canada address.}

Blog comments close on Monday, December 19th at 11:59pm (Pacific) and the winners will be announced Wednesday, December 21st on the Authentique Paper blog and the Scor-Pal blog.

The Project:

It's getting down to the wire for Christmas shopping - and when time is getting short for finding that perfect gift (and you know that the recipient would enjoy picking out something on their own), sometimes gift cards really are the best answer.
{Some people may argue that gift cards are impersonal, but if you know me you know I would rather have a gift card over a gift any day.}

No matter who is on your list - try giving your gift card a personal touch with a handmade gift card holder.


I created this matchbook style gift card holder using my Scor-Pal and Authentique Paper's Blissful collection.
It is created in three parts - a tag, the gift card envelope, and the matchbook cover. I didn't take pictures as I was creating these (sorry!), so I am going to do my best to describe the creation process.

To create the tag:
Start with a 2 3/8" x 4" piece of patterned paper.
Punch two 1" round circles from another piece of patterned paper. Adhere one circle to one of the 2 3/8" sides of the tag, with about 1/2 of the circle on the tag and 1/2 off the edge. Flip the tag over and adhere the other patterned paper circle on the back, lining it up with the circle that was adhered to the front.
The size allows for a gift card to be adhered to the tag with a removable adhesive.


To create the gift card envelope:
Start with a 5 1/2" x 4 1/2" piece of patterned paper.
With the 4 1/2" side along the top of your Scor-Pal, score at 1/2".
Rotate the paper 1/4 turn (so the 5 1/2" side is along the top of the Scor-Pal) and score at 1 1/2" and 4". Pre-fold along all score lines.
Trim off the two 1/2" x 1 1/2" scored off corner sections.
Punch a half round piece from the center of the middle 2 1/2" x 4" scored off section.
Fold in side 1 1/2" flaps and adhere where the flaps overlap with Scor-Tape. Fold up the bottom section and adhere with Scor-Tape. {You will now have an envelope that is open on one end.}


To create the matchbook cover:
Start with a 3" x 10 3/4" piece of patterned paper.
With the 10 3/4" side along the top of your Scor-Pal, score at 7/8", 1", 6", and 6 1/4". Pre-fold along all score lines.

Tuck the closed end of the gift card envelope into the 1/8" scored off section of the matchbook cover. With the 7/8" flap over the bottom of the front of the gift card envelope and the rest of the matchbook cover at the back of the gift card envelope, staple approximately 1/4" in from the bottom edge. This will hold the gift card envelope in place. Insert tag (and gift card).
Fold the matchbook cover up and over the top and tuck into the stapled flap to form the matchbook style closure.


Thanks for stopping by today!

The Next Stop:
Steph Ackerman's blog


Supplies:
Patterned Paper: Authentique Paper (Blissful Collection - Euphoria, Paradise, Happiness, Prosperity, Felicity, Pleasant);
Die Cuts: Authentique Paper (Blissful Collection - Tabloids);
Twine: The Twinery (Charcoal, Lemondrop);
Adhesive: Scor-Pal (Scor-Tape - 1/4");
Tools: Scor-Pal (Scoring Board); We R Memory Keepers (Corner Chomper - 1/4" and 1/2" Round); Fiskars (Trimmer, Scissors, Round N Round Squeeze Punch); Tim Holtz (Tiny Attacher);

Friday, December 16, 2011

Christmas Memories Mini Album {May Arts}


I created this mini album for a recent challenge from May Arts.
The album uses various accents from May Arts and papers, die cuts, and stickers from Authentique Paper's Wonder collection.


I found some old Christmas photos that remind me of the happy times we had together during the holidays at my Grandpa & Grandma's house.

I truly love the holidays now, but those Christmas memories from when I was younger sure are sweet.

{That's little ol' me in the "Family At The Table" picture.}

Hope you have a wonderful day!


Supplies:
Patterned Paper: Authentique Paper (Wonder collection);
Die Cuts: Authentique Paper (Wonder collection - Icons, Tabloids, Headlines);
Stickers: Authentique Paper (Wonder collection - Petite Type Square, Petite Type Circle, Classic Type, Diction);
Chipboard: Oriental Trading;
Ribbons/Fibers: May Arts;
Other: (Wooden Buttons);
Tools: Fiskars (Trimmer, Scissors, Craft Knife);

Thursday, December 15, 2011

I've got the blues... {Market Street Stamps}

{As seen today on the Market Street Stamps blog}


Okay...no - I am not depressed, but I DO seem to have a case of the blues.

A little background about me: I grew up in a house that was completely decked out in various shades of what I call "Country Kitchen Blue". Thanks to being surrounded by it for so many years I now cringe when I even think about the color blue.

But for some reason - I think due to my love for teals and aquas - blue has started to slip back into my life.
{Only on paper. Don't expect to see me decorating my house in blue anytime soon. Or ever.}


I have seen some beautiful projects created with the new Flurries background stamped in white...but I thought I would add a bit of color to it. This background stamp (like all the others from Market Street Stamps) stamps beautifully. There are so many great ways to use this stamp!
I wanted to let it shine on this card so I used an almost A2-sized panel to let it take center stage.
{The background stamps from Market Street Stamps will completely cover the front of an A2-sized card, but I trimmed a bit off to have the kraft border show.}


I added a sentiment from the Essential Holiday Elegance set and topped it all off with a white button and some Denim twine.
This card would be easy to create in multiples, but has a big impact thanks to the beautiful Flurries background.

I hope you'll stick with me just a little bit longer as I share another blue(-ish) card with you:


This one uses one of the cute sentiments from the Chillaxin' set and is finished off with some cute little paper ties.
{I don't even know anyone who actually wears ties on a regular basis anymore, but they sure do look cute on a card!}


Thanks for coming by today!

Joy Of The Season Card Supplies:
Cardstock: Georgia Pacific (White); The Paper Company (Kraft);
Stamps: Market Street Stamps (Flurries, Essential Holiday Elegance);
Ink: CTMH;
Twine: The Twinery (Denim);
Other: (White Button);
Tools: Fiskars (Trimmer, Scissors); Martha Stewart/EK Success (Scoring Board);


Family Ties Card Supplies:
Cardstock: Georgia Pacific (White); Core'dinations (Aqueduct);
Patterned Paper: Echo Park (Little Boy collection - Awesome Dots);
Stamps: Market Street Stamps (Chillaxin');
Ink: Tsukineko (Red Magic);
Other: (Vintage Book Page);
Tie Pattern: Tifany DeGough;
Tools: Fiskars (Trimmer, Scissors); We R Memory Keepers (Corner Chomper - Stub); Martha Stewart/EK Success (Scoring Board);

Wednesday, December 14, 2011

12 Joyful Tags {Authentique Paper - Tutorial}

{As seen today on the Authentique Paper blog}


Hi there!

Today I'm coming to you with a tutorial on how to use this "Surprise" sheet of Authentique Paper's Wonder collection:


And easily turn it into 12 great Christmas tags:


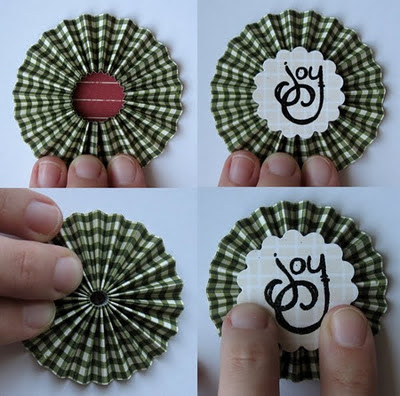
First we will need to create the rosettes (or medallions) for the tags.
{And may I just say in advance that I am fully aware now of why companies use hand models. And no...I don't ever have the hope of becoming one.}

Start by scoring a "Curiosity" sheet of paper every 1/4".
{Tip: I scored the whole 12"x12" sheet at once and then cut it into 12 strips to make my 12 medallions. Much easier than trying to score 12 strips!}

Once your sheet is scored, cut it into 12 1" wide strips and begin to accordion fold each strip.


Use a secure adhesive to adhere the folded strip into a circle.
{Tip: Trim off one section from one end of each strip so that only one section is overlapping to form the circle. This will create less bulk at the overlapping area.}

Using the Foundations paper, punch 12 scalloped circles. Stamp each circle with your sentiment and heat emboss. Then, using some of your Authentique Paper scraps, punch a circle for the back of each medallion.


Use a strong adhesive and place it on the scalloped circle (back piece). Place your accordion folded circle around the back piece and squeeze just at the tops and press down to create the medallion.
{Tip: Use both hands for this process. I used both hands for the actual creation of each rosette, but had to use one hand here to take the picture.}


{Tip: You can adjust the size of your rosette by the amount by how much you squeeze the accordion folded circle in toward the center. You can adjust the final size of a rosette that started with a 1" wide strip (like we have done) from anywhere between 2 1/4" to about 3".}

After your adhesive is secure, add the scalloped circle with your sentiment to the front of your medallion.


{Tip: I use a couple large acrylic blocks to give a little bit of weight to hold my pieces in place while the adhesive is drying.}

While your adhesive is setting up, separate each of the numbered cards from the "Surprise" paper with your paper trimmer. When the adhesive is dry, adhere one medallion on each card.


{Tip: I used the number on each card as a reference for where I would place each rosette. The varied placement on each card gives every tag an individualized look.}

Add some string or twine to each card, punch a hole and thread with ribbon or seam binding...and you've now got 12 beautiful tags perfect for the holiday season!
{Tip: You can use these tags for gifts, but don't stop there - they would also make great embellishments for holiday themed scrapbook pages, tree ornaments, and would even look great strung together as a garland!}


Thanks for stopping by today!

Supplies:
Patterned Paper: Authentique Paper (Wonder Collection - Surprise, Curiosity, Foundations);
Stamps: Market Street Stamps (Simple Joys);
Ink: VersaMark (Watermark);
Embossing Powder: American Crafts (Zing - Black);
Other: May Arts (Burlap String); Hug Snug (Seam Binding - Chalk White);
Adhesive: Ranger (Matte Accents);
Tools: Fiskars (Trimmer, Scissors, Seal of Approval Squeeze Punch); Martha Stewart/EK Success (Scoring Board);

Tuesday, December 13, 2011

Winter Wishes


This card was created using a few different Unity stamps.
The sentiment was included with one of last year's issues of Paper Crafts magazine. The ornament was one that I received as a bonus free stamp with a Unity order - so I am not quite sure which set it comes from. The background is called Worn Grid.

I did embossing with white embossing powder on all the stamped images and I love the look it gives on kraft cardstock.


Thanks for stopping by today!

Supplies:
Cardstock: Georgia Pacific (White); The Paper Company (Kraft);
Stamps: Unity (Ornament, Sentiment, Worn Grid);
Ink: VersaMark (Watermark); Tsukineko (Pink Grapefruit, Mango Madness, Thatched Straw, Key Lime, Aquatic Splash, Sea Breeze);
Embossing Powder: Hero Arts (White);
Twine: The Twinery (Blossom, Honeydew);
Other: (Button - White);
Tools: Fiskars (Trimmer, Scissors); Martha Stewart/EK Success (Scoring Board); Ranger (Heat Gun);

Monday, December 12, 2011

Love Life


Sometimes I just want to see what can be done with plain white cardstock, stamps, and ink.

I love these two stamps because they are a nice, large size that is great for a quick card - but they could easily be used on a scrapbook page as well.


Supplies:
Cardstock: Georgia Pacific (White);
Stamps: Unity (Love Life - Melody Ross);
Ink: Tsukineko (Pink Grapefruit, Jumbo Java);
Tools: Fiskars (Trimmer); Martha Stewart/EK Success (Scoring Board);