Thursday, December 10, 2009

A new project...

I've started on a new project...a scrapbook for a friend. Right now I am working on pages for about the first year and a half of her daughter's life.

I am so excited to be doing this! {And, for some reason the creative juices seem to flow better when I am not scrapbooking my own family.}

These pages are a bit more "frilly" than I intend the rest of the album to be, but it's an adorable little girl and sometimes girls need a bit of frill {but don't tell my daughter I said that!}.

The album I am working with allows 12 x 12 or 6 x 12 pages. I had never done a 6 x 12 page before, but I am really liking them!


{As always, click on the pictures if you would like to enlarge them a bit.}

Monday, November 30, 2009

More Pink Paislee

I was having so much fun playing with my Pink Paislee papers that I whipped up two more projects...another layout and a small notebook. Both use the Office Lingo Collection papers.

Here they are:


{The overlay on the notebook is from Hambly.}

Don't forget to visit A Walk Down Memory Lane!

READ All About It


It's not too late to get some great Pink Paislee goodies 15% off at A Walk Down Memory Lane, but November is quickly coming to an end...so you'd better hurry up!


I created this layout about my daughter learning to read using the Pink Paislee Pop Fashion Parachute Pants 12 x 12 paper as the base and matted my focal picture on DCVW cardstock. I added some Maya Road pins, a sprinkling of brads, a few {digital} library cards created by Shimelle {I changed the color of the original cards and added the text with GIMP}, and voila!

Monday, November 9, 2009

Pink Paislee at A Walk Down Memory Lane

This month I am a Guest Designer for A Walk Down Memory Lane {AWDML} and the featured manufacturer for November is Pink Paislee! And featured manufacturer means 15% off...all month long!

Today I am going to share with you a layout about each of my three children using Pink Paislee papers.

True Beauty:


This layout features a few papers from Pink Paislee {and I got them at AWDML, of course}.

True Beauty Supplies:
- Pink Paislee Sweet Cakes - Lovey Dovey
- Pink Paislee Enchanting - Wonderful
- Pink Paislee Enchanting - Pleasant
- American Crafts Thickers
- Tim Holtz Distress Ink
- Chandalier stamp by Tim Holtz for Stampers Anonymous
- Making Memories Glitter Clears #30164
- Title piece created using GIMP


Big Shoes:


I love this background grid paper from Pink Paislee...the detail in the distressing of this paper is fantastic. It even has some light textile type designs on it faintly along the edges. It makes it easy to create a nice looking layout when the papers are so beautiful to start!

Big Shoes Supplies:
- Pink Paislee Office Lingo - Cubicle
- Basic Grey Mellow 6x6 Pad
- American Crafts Thickers
- Tim Holtz Distress Ink
- Tim Holtz Tiny Attacher
- Sharpie Fine Tip Marker {Black}


Oh, Baby:


This background paper from Pink Paislee is fabulous! I added the stamping behind the photo just because I felt like I was cheating with such an easy layout...the paper had so much character by itself that it really didn't need anything!

Oh, Baby Supplies:
- Pink Paislee Captivating - Tender
- DCWV Cardstock
- American Crafts Thickers
- Tim Holtz Distress Ink
- Accent stamp by Tim Holtz for Stampers Anonymous
- Sharpie Pen. {Blue}


Stay tuned this month for more fun from AWDML and Pink Paislee!

Friday, October 30, 2009

I can see CLEARLY now...


Well, it may still be rainy season, but I can see clearly with this super fun acetate album from Creative Cuts and More! It probably wasn't the best idea to choose to do a clear album as a Guest Designer when I hadn't ever done one before, but I love how it turned out!

If you've never done an acetate album before...try it! It wasn't quite as scary as I had expected!
{I'll be sharing a few tips with you that I learned along the way...and if you have tips on how to photograph a clear album, please...let me know!}


Tip: Pick a color scheme.
Because you can see portions of all the pages in a clear album, choosing a couple of colors that go well together will help all the pages in your album feel connected. I chose to work with the main colors of pink, teal, and white. I decided to print my photos in black and white to allow all the surrounding colors to show their stuff.


Tip: Don't be afraid to repeat.
I'll be honest with you. I was super excited to have an opportunity to work with a clear album - but when it arrived I took one look at it, went into a panic...and...put it on a shelf. Every time I looked at it I thought "What in the world am I going to do with that?"

Finally I came up with an idea that worked for me - using the same basic pattern for each page. I decided to cut all of my pictures and mats the same shape and size and place them directly in line.


Tip: Embrace the clear.
I wanted to add a bit more detail, but not take away too much from the album, so I used a Coluzzle template and knife to make a few accent marks around the photos. They add a touch of interest to the pages without taking the focus away from the photos. There are also many beautiful clear embellishments out there...don't be afraid to use them.

I also used a Fiskars punch to make a template for the star and cut it out using my Fiskars craft knife. Acrylic albums will be too thick to do something like that, but the acetate album was so easy to work with! I used a small Fiskars hand punch to punch the hole for the charm and also add a little touch to the scalloped page...it worked easily.


Tip: Paint covers over a multitude of rough spots.
When you plan to have your pictures in the same spot on each side of the page, know that there is a very good possibility that thing may not be perfectly lined up...there may be inconsistencies in your cuts or just a slightly unsteady hand. I found acrylic paint to be a great way to cover up the small spots where things weren't completely lined up. Being that I discovered this in the middle of the process, I had to go back and add paint where I found mistakes...but next time I think I will just paint a bit before I place down my photo mats and the process will go much smoother. Many folks also use acrylic paint to highlight the edges of their album pages.

If you are not into the distressed or shabby chic look, you can use a stencil to create a more defined paint pattern. A non-paint option would be to use a coordinating double sided paper a size bigger than your other mat and then the edges would be sure to be covered and it would give a nice border effect on the reverse side of the page.


Tip: Go sticky!
My photo mats are all Autumn Leaves adhesive mats {I used a Coluzzle template and knife to cut them}. The adhesive mats made it very simple {and fast!} and they adhered nicely to the acetate pages.


Tip: No StazOn? No problem! Rub-ons are your friend.
For this album I used some gorgeous Hambly rub-ons {and clear stickers, too}. I rescued some of the rub-ons from a trash can at a recent Fiskateer crop. We had a surprise visit from one of the owners at Hambly and she had thrown a couple of rub-ons in the trash because the protective sheet had come off and she was afraid they wouldn't work - but they still worked perfectly! {Yay for dumpster diving!}

Rub-ons are a great way to add some fun designs and great pops of color in your clear album. They are easy to place on the page and so fast and easy...and they also don't require clean up like stamps {yay!}.


What? After all that you are still scared of doing a clear album? Not to worry! Creative Cuts and More offers this album set in chipboard, too! {I think a beautiful album could be done alternating clear and chipboard pages...get both sets and give it a try!}

Note: My album is only 4 pages - half of the 8 piece die cut set from Creative Cuts and More. You can use all 8 pages in one album or split them up and create two 4 page albums...either way it is a fantastic deal!

Supplies from Creative Cuts and More:
1 x Mix & Match #02 Mini Album Set: Acetate

Monday, October 26, 2009

My baby girl is growing up...


In less than a month, Lacie will be 6 years old. Crazy! She loves to do crafts with me and she tells me I "make good things", so I thought I'd make something for her.


This tin set from Creative Cuts and More sparked the idea of what to make for her. {Lacie loves anything with sparkle and I love that I was able to get this set and the bag cut in beautiful Bazzill Bling - the pictures don't do the beautiful shimmer justice.}


Since the accordion insert is six sections long, I decided to dedicate each section to each year of her life. I used some Heidi Grace rub-ons for the candles {the number of candles in each section corresponds with how old she was in the picture} and the other accents.


I sized some pictures of her so I could easily cut them out with a Fiskars Round n' Round Squeeze Punch {Medium}. I printed the pictures onto plain white cardstock and then topped them with some Glossy Accents to give them some shine and a bit of dimension. I placed each picture on Pop Dots over a Prima flower. I love that even with adding all that dimension to each section, the tin is large enough that everything still fits nicely inside.


Every little girl loves accessories, right?

Who am I kidding...big girls love accessories, too!

This bag is the perfect accessory for the accordion tin. The tin fits easily inside {and there is plenty of room for dimensional embellishments on top of the tin}, and I am sure Lacie will find lots of other things to stick inside this bag as well. I again used some Heidi Grace rub-ons and cardstock stickers to embellish the bag and topped it off with Stickles for some extra bling.

If you'd like to see other options for the accordion tin set or the many bags that Creative Cuts and More offers, be sure to check out the Diecut Diva blog! And be sure to come back soon as I reveal my final {and probably my favorite} project as October's Guest Designer for Creative Cuts and More...I will have it posted sometime this week!

Thursday, October 15, 2009

Creative Cuts & More - Blog Hop Time!

Welcome to my spot on the Creative Cuts & More Blog Hop!

If you haven't been following the blog hop, please be sure to head on over to the Creative Cuts & More blog in order to find out how you can win a FALL ALL OCCASIONS CARD KIT and get a coupon code for 15% off of your order. {Oh, okay...I'll spill it here. The coupon code is Octbloghop1509.} 15% off the already great prices on the die cuts, papers, Killer Red Tacky Tape, and more is a fabulous treat...not to mention all of the great eye candy along the blog hop! {The next stop is at Steph Zerbe's blog.}

Thanksgiving & Christmas are sneaking up on us, and I'd like to share some holiday projects that are quick and easy {thanks to the die cuts from Creative Cuts & More}, and also very cute {if I do say so myself!}.

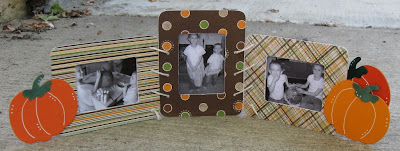
First off, I made this frame set with a fall/Thanksgiving theme, but you could use different papers and embellishments to easily suit any occasion.
{You can click on any picture for a larger view.}


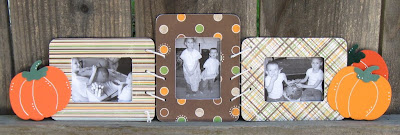
I started with the rectangle frames in a heavy chipboard and covered them with some great fall colored papers from Bo Bunny. I then used my Crop-A-Dile and some twine to attach the frames.


I love these pumpkin cuts! I used some of the awesome velvet paper from Creative Cuts & More and hand cut the accents for the pumpkins. I just topped them off with a little bit of detail using a white Inkssentials pen.


{All the links to the supplies for this project from Creative Cuts & More are listed below.}

And here's a little helper for "Santa":


This little book is small enough to fit in your purse, but can easily hold all the lists to help you manage your gift shopping. And after you are done shopping, you can add a few album pages and turn it into a great holiday mini-album!

The velvet paper from Creative Cuts & More is a must for any of your Christmas projects...it is so soft and beautiful. It is also super easy to cut! The back of the paper has a surface that is very easy to trace onto to make your cutting easy!
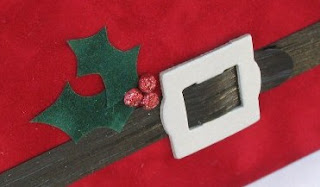

I love all the options for each of the great die cuts...you can get them in foam, acetate, many different papers and cardstocks, felt, polyshrink, different weights of chipboard, velvet, vellum...and even Tacky Tape! For the buckle I used a light weight chipboard cut and topped it with a metallic cardstock cut. The chipboard adds a nice depth to the buckle and the metallic cardstock was so easy to cover the chipboard with since it was already cut to the same shape.
{All the links to the supplies for this project from Creative Cuts & More are listed below.}

Supplies:

Thanksgiving project:
3 x Rectangle Picture Frame - Large: Chipboard - Heavy Weight
3 x Pumpkin #04 - Small: Chipboard - Light Weight
1 x Pumpkin #04 - Small: Textured Bazzill - Butterfly
1 x Pumpkin #04 - Small: Textured Bazzill - Marmalade
1 x Pumpkin #04 - Small: Textured Bazzill - Bazzill Orange
1 x Cypress Velvet Paper
1 x Mint Velvet Paper

Christmas project:
1 x Buckle #01 Set: Chipboard - Medium Weight
1 x Buckle #01 Set: Galvanized Silver
2 x 4"x4" Mini Album Cover: Black Chipboard - Heavy Weight {and 4"x4" Mini Album Pages, optional}
1 x Tomato Velvet Paper
1 x Alpine Velvet Paper


Please make sure you've been to all the fabulous stops on the Creative Cuts & More Blog Hop:
Creative Cuts & More Blog
Holly Brown
Pam Smerker
Kayla Dupont
Rita Barakat
Lindsay Weirich
Ellen Sosnoski
Chris Dickinson
Tifany DeGough {that's me!}
Steph Zerbe<--- GO HERE NEXT!
Angie Pearl

Please sign up to be a follower and come back soon to see some of the other projects I am working on for Creative Cuts & More!

Tuesday, October 6, 2009

Crazy Pair

This is my debut project as the October Guest Designer for Creative Cuts & More! I am so excited to work with their products this month. Be sure to get ready for a great blog hop on Friday, October 16th. Come back here to see what I've created and also be sure to visit the Creative Cuts & More designer's blogs {I'll have links for you then} to see what they've come up with!


Get it? Pear...pair...very punny, right?

For now, let's talk about today's project, shall we?

I really wanted to create a layout with shaped paper, but it is harder than it looks! I just added the kraft cardstock behind the great scalloped circle cut from Creative Cuts & More and felt comfortable again. I paired {ah, get it..."pair"ed?} the cute pear cuts with a chipboard frame. I generally cover my chipboard with paper, but this time I thought it looked nice plain. I added in the pictures of two of my crazy kids, a 6x6 sheet of Basic Grey Archaic paper, and then created the title spot using a basic shape from a free digital scrapbooking journal stamp and created the grid and title with GIMP {the font is CK Newsclips}.


The great cuts from Creative Cuts & More really helped the project come together quickly! The supplies I used are listed below if you'd like to scraplift my layout {and if you'd like to use my title spot just click on the image below for the full version}.


Creative Cuts & More Supply List:
1 x Circle - Scallop Mini 11 1/2": Textured Bazzill - Chiffon
1 x Antique Elegance Frame: Chipboard - Medium Weight
2 x Pear - Mini - Family Preserves: Textured Bazzill - Pear
2 x Pear - Mini - Family Preserves: Textured Bazzill - Parakeet

Other Supplies:
Basic Grey paper, kraft cardstock, Fiskars scissors
, GIMP

Monday, September 14, 2009

Just Beachy


Yep...it's another Bo Bunny project for me. I loved the surfboard paper from the Beachy Keen collection and just had to use it. I love the vintage look and the surf theme reminds me of my Dad.

Here are the papers I worked with:


I made a few surfboards out of "chipboard" {aka: old Trader Joe's Macaroni and Cheese boxes} and attached the paper to them and distressed them a bit. I use different things for distressing the edges depending on the look I want, and for this project I thought it needed some good little scruffy spots so I used some scissors to rough it up.


I hand cut the banner and wrote on the sentiment. I curled it for some dimension and attached it with FabriTac. I don't think I have ever used FabriTac on actual fabric {well, ribbon, I guess}...but I love it for paper projects!

I used the oval Coluzzle template and the Coluzzle knife to cut out the rounded pieces. I added the dots on the front of the card {and on the inside} using the Time Holtz Design Ruler and a Sharpie "Pen.". Not a Sharpie marker...they have a new pen called "Pen." It works great with the holes in the Design Ruler.

For a little extra embellishment inside the card I used the Fiskars Round n' Round Squeeze Punch to punch out some of the little accents on the paper. Here's a little peek inside...


Supplies:
Papers: Bo Bunny {Beachy Keen & Abbey Road}, Core-dinations, Georgia Pacific
Tools: Fiskars Round n' Round Medium Squeeze Punch, Tim Holtz Design Ruler, Coluzzle Oval Template, Coluzzle Knife, Fiskars Scissors
Other: Sharpie Pen., chipboard

Friday, September 11, 2009

NO WAY!!!

Guess who has a project featured on the Bo Bunny blog today???


Me!

Check it out!

Wednesday, September 9, 2009

Stay Tuned...

Keep watching this blog in the near future!


I've been selected as a Guest Designer for two online stores!!! {I'm so excited!}

I'll be a Guest Designer for Creative Cuts and More in October and for A Walk Down Memory Lane in November!

And while you're waiting...head on over and check out what they have to offer! {And if you check out the A Walk Down Memory Lane DT Blog you might find out some special information for a one day only 99 cent shipping sale}

Wednesday, September 2, 2009

Just the two of us.

Here it is.

The one {and only} layout I completed at the Fiskateer crop I went to recently.


I'd like to blame my lack of productivity on the fact that I had Westin with me, but with all the fun make and takes and goings on I don't think I would have accomplished much else even is I didn't have a baby with me. And actually, I didn't even finish the layout there. I added the picture and photo mat to it yesterday. {This picture was taken outside my cousin's house as we were dropping off the kids to go see a production of The Phantom of the Opera. An amazing show, by the way...}

I'm sure you'll recognize that Bo Bunny paper from some of the recent projects I have already posted. I used the Fiskars Funky Love Squeeze Punches (Medium & Extra Large) to finish off some of the scraps. I placed a strip of Coredinations cardstock along the side and roughed up the edges with some scissors to bring out the yellow color core of the paper. I found the lace and the faux leather cording awhile back in the craft section in WalMart, and topped it off with some shaped clips from my stash.

Supplies:
Papers: Bo Bunny, The Paper Company, Coredinations
Tools: Fiskars Funky Love Squeeze Punches, Fiskars scissors
Embellishments: Lace, suede cording, shaped clips

Tuesday, September 1, 2009

A bit sketchy...


This card is based on the Fiskars September 09 Card Sketch.

I started with some left over scraps of Autumn Leaves paper from a recent project and put my Funky Love (Medium) Punch to work to make the flower petals and leaves. To make the center of my flower I used the Round 'n Round (Medium) Punch and the 1/16" Circle Hand Punch. Then I attached my "petals" to the center piece {some were embossed using the Cuttlebug}.

I braided some paper cording for the stem and used my No. 5 Softouch® Micro-Tip® Scissors to cut the green paper for the landscape.

I added a few finishing touches, and voila!


Supplies:
Paper: Autumn Leaves
Punches: Fiskars - Funky Love, Round 'n Round, 1/16" Circle Hand Punch
Other: Paper cording, eyelets
Other Tools: Cuttlebug, Fancy Corners Embossing Folders, Crop-A-Dile, Fiskars No. 5 Softouch® Micro-Tip® Scissors, Sharpie Pen

Friday, August 28, 2009

Crop 'Til You Drop!

I've told you before about how you should join the Fiskateers.

Recently my sister-in-law {Jenny} and I were able to go to a Fiskateer crop in Concord...it was such a blast!


{Westin joined me, too!}


I realize that sometimes you just can't get out of the house to make it to a crop, and Fiskars has thought of that, too! There is an online crop today and tomorrow on the Fiskateers message board.


Join in on the fun!!!

Tuesday, August 25, 2009

It's got purse-onality!


I've been wanting to make a purse for a long time now. The purse I was carrying was just too small and one big inner pocket. I wanted something with lots of pockets for all the things I think are necessary to carry with me at all times. You know - like a tape measure, gum, chapstick, coupons, lots of pens, a cell phone, my wallet, a planner, random pacifiers and toys and various other odds and ends. I wanted pockets everywhere.

In the front:

On the sides:

In the back:
{Check out all those pen slots!!! There are ten!}

And of course, inside:
{There is a pocket at the back, two pockets at the front, and two bigger sections divided by another two pockets.}

With plenty of room for my big, fat wallet {which is stuffed with more junk...I mean necessities}:
{Note to self: Buy a brown wallet.}

I wanted an adjustable buckle type thing for the strap, but I couldn't find one and wanted to be able to use my purse...so this is what I have going on for now:

I found the outer fabric at JoAnn's in the remnant bin and got the toile for the inside there as well. (Coupon!)

For the flap decoration I made my own appliqué of a bird like I made for this card.

It's still not exactly what I had hoped for, but I am happy to announce that even making my own pattern there were no major mess-ups or seam-ripping episodes, so I will declare this one a victory!